Maintaining a good seasoning on your griddle is important to keep food from sticking and to prevent rust. Over time the seasoning will become uneven and you’ll need a do-over. In this detailed guide we’ll show you how to strip and re-season a Blackstone griddle from scratch.
If you don’t keep your griddle clean and well-seasoned you’ll notice food starting to stick to it and you might also get a nasty taste to whatever you cook on it. You may even notice pockets of rust on the cooking surface, which you certainly don’t want.
Depending on your Blackstone’s current condition, there are 3 different levels or depths of cleaning and seasoning that might be required.
- Maintenance cleaning: this should be done each time you finish cooking on your flat top so it will be ready for its next use
- Minor Repairs: when your griddle seasoning is starting to peel or flake and it needs a little extra TLC to get back into shape
- Completely strip down and re-season: when you reach this stage your griddle is in seriously rough shape and you need to strip it down and rebuild from scratch
In this article we’re focused on the third level and teach you how to strip and re-season a Blackstone that’s in really rough shape.
We’ll help you get your flat top looking like new in no time.
Is Your Blackstone Beyond Repair?
Probably not. I’ve seen some pretty nasty looking griddles but with some work they can almost always be restored to their former beauty.
Don’t believe me? Check out this Blackstone picture from a Reddit group:
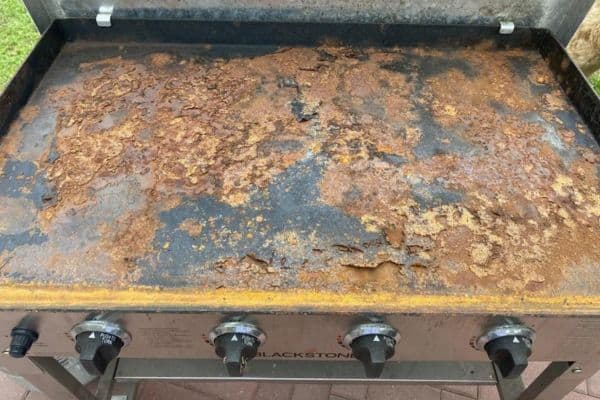
You might take one look at that rusty flat top and assume it was a lost cause. But the wise Redditor who posted the picture knew better. Just look at the “after” picture of that same griddle:
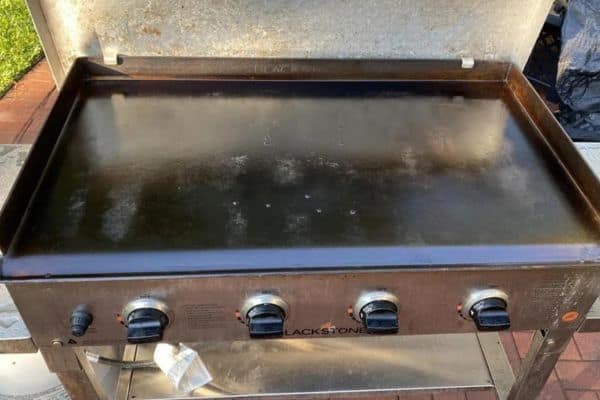
No matter how bad you think your Blackstone looks, if you follow the steps in this guide you can get it looking as good as new!
How Do You Strip And Re-Season A Blackstone Griddle?
Stripping and re-seasoning a Blackstone griddle is a simple process, but it does require some hard work.
- Step 1: Scrape down all seasoning layers and any rust on the griddle surface. You can do this by hand or with power tools if you have them.
- Step 2: Thoroughly wash the flat top to remove all dust and debris.
- Step 3: Make sure the cooking surface is completely dry and clean.
- Step 4: Re-season your grill using the same process you’d use when seasoning a Blackstone for the first time.
Step 1: Stripping Down Your Blackstone
The first thing you need to do is get any rust off the cooking surface and remove all the previous layers of seasoning. There’s a hard way to do this and a much easier way.
Whichever method you choose, make sure to wear some old clothes that you don’t mind getting messy.
The Hard Way
The hard way will be time-consuming and exhausting. You’ll need to use some gool old-fashioned elbow grease to remove any rust and seasoning on the griddle and get down to the original surface.
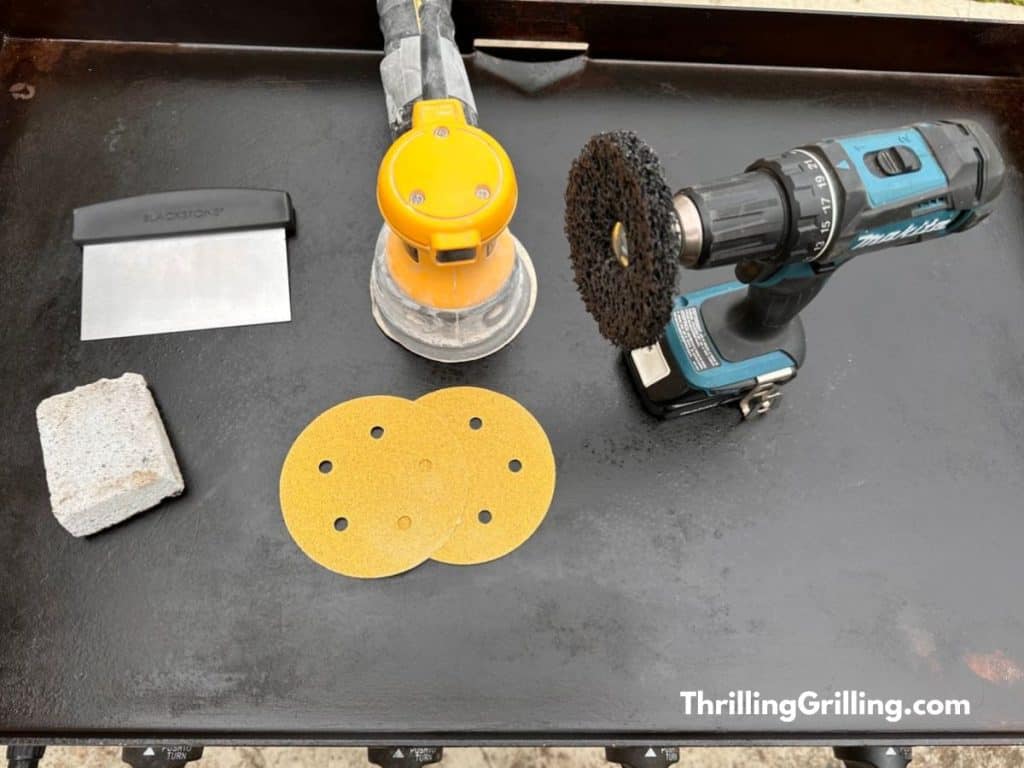
If your griddle is in really rough shape like the one in the picture above, start by using a basic steel scraper like this one to scrape off anything loose and spray it down with a garden hose or power washer.
Next you need to attack your griddle’s cooking surface with a grill brick like this one. Put some muscle into it and scrape hard to really dig away at all that built up seasoning. It helps to use some water and dish detergent to wash away the debris as it comes up.
Now, I know what you’re thinking. Doesn’t everyone always say you should never use soapy water on a Blackstone?
Normally you wouldn’t want to use dish detergent when cleaning your Blackstone griddle because the detergent will eat away at the layers of seasoning that keep food from sticking and protect the griddle surface from rust.
But when you’re trying to strip and re-season your griddle from scratch, that’s exactly what you want. The dish soap will help you wear down the seasoning faster and easier.
The Easy Way
If you want to speed up the process, power tools will allow you to finish stripping your Blackstone in a fraction of the time.
I’ve tried 3 different power tools to strip seasoning off a Blackstone. They all work well but one really stands out to me as the best.
First, is the random orbital sander like this one. Use sanding discs with a course grit and make sure you have plenty on hand because you’ll go through quite a few before you’re done. Just use the sander to remove the seasoning until you get down to the original surface.
Of course, you actually need to own an orbital sander or at least have a friend who will lend you one.
The second method is a drill with a wire brush bit. This set is perfect because it has multiple sizes which will help you get into those hard to reach corners.
Finally, we have a cordless drill with a paint and rust stripper attachment. This is my favorite way to strip down a Blackstone. The bit itself in inexpensive and will work with whatever kind of drill you have. Plus, it blasts rust and seasoning off the flat top better than anything else I’ve tried.
- STRIPS QUICKLY
- CUTS FAST
- FOLLOWS SURFACE CONTOURS
- For use on wood, metal, plastic and fiberglass
- Package Contents: 1 disc/p
Prices pulled from the Amazon Product Advertising API on:
Product prices and availability are accurate as of the date/time indicated and are subject to change. Any price and availability information displayed on [relevant Amazon Site(s), as applicable] at the time of purchase will apply to the purchase of this product.
Step 2: Wash It Down
At this point you probably have a dusty mess all over the place. Take a garden hose and spray the grill plate down well to wash it all away.
You may notice a few spots that you missed when stripping it down and you can go back and touch them up now and then spray it down again. Make sure you have a nice smooth surface before you start re-seasoning.
Step 3: Dry Your Griddle
Pretty self-explanatory. Use a cotton cloth or some paper towels to dry any moisture off the griddle surface.
Step 4: Re-seasoning Your Blackstone Griddle
The hard work is done and now you should have a restored griddle plate that looks like new, or close to it at least.
Now it’s time to season your griddle so you can start cooking on it. We’ve already written detailed instructions for seasoning a Blackstone griddle, but let’s quickly go over the process again here.
Fire up your griddle and let it warm until it’s good and hot. It has to be hot enough to reach the smoking point of whatever oil you’re going to use. We cover everything you need to know about that here.
Take your oil of choice and drizzle a tablespoon or two on the griddle. Use paper towels or a cotton cloth to rub the oil all over the griddle surface as thinly and as evenly as possible.
Before long the oil will start to smoke. This is what you want, it means the heat is breaking the oil down so it can bond with the griddle steel and create a layer of non-stick seasoning. You’ll notice the griddle surface get visibly darker.
Wait until the smoking has almost completely stopped, then repeat the process a few times until the griddle surface is evenly seasoned. I usually do around 3 or 4 layers.
Don’t worry if the edges and corners don’t get quite as dark as the middle of the griddle. They’ll darken over time as you cook on it.
When you’re satisfied with your griddle’s seasoning you can shut off the propane and let it start cooling. The last thing you should do before you call it a day is spread one more very thin layer of oil. This will help protect the surface and keep it ready for for your next meal.
Tips And Tricks
If possible, remove the grill plate from the Blackstone (it’s heavy, have a friend help to be safe) and lay it down flat on a deck or in the grass. It will be more stable and you’ll be able to use much more force without having to worry about the whole griddle shaking or moving around.
If you’re using power tools to strip the seasoning off your Blackstone, it’s a good idea to wear a face mask and eye protection. There will be a lot of dust and you don’t want that in your eyes or lungs.




Leave a Reply