Undercooked ground beef or sausage can be deadly. Use our helpful hamburger temperature guide to make sure you don’t feed unsafe burgers to your family.

Studies show that Americans consume over 50 billion hamburgers each year. If you stacked all those burgers on the surface of your grill the top of the pile would reach twice as far the moon.
That’s a lot of burgers!
Now, whether you’re a burger-maniac like me, or you only eat one occasionally, it’s important to know how to cook them to an appropriate and safe temperature.
In this hamburger temperature guide, we’ll teach you the right temp to cook your burgers to, the danger of undercooking, and ways to reduce the risk of contamination when cooking burgers.
What Temperature Should Burgers Be Cooked To?
According to the USDA, the minimum safe temperature for ground beef is 160 F. Cooking your burger to at least 160 F will ensure any bacteria is killed and the burger is safe to eat.
Of course, not everyone enjoys their burgers cooked well done (including me). Many burger aficionados prefer to take their chances and cook to a lower temperature than is recommended.
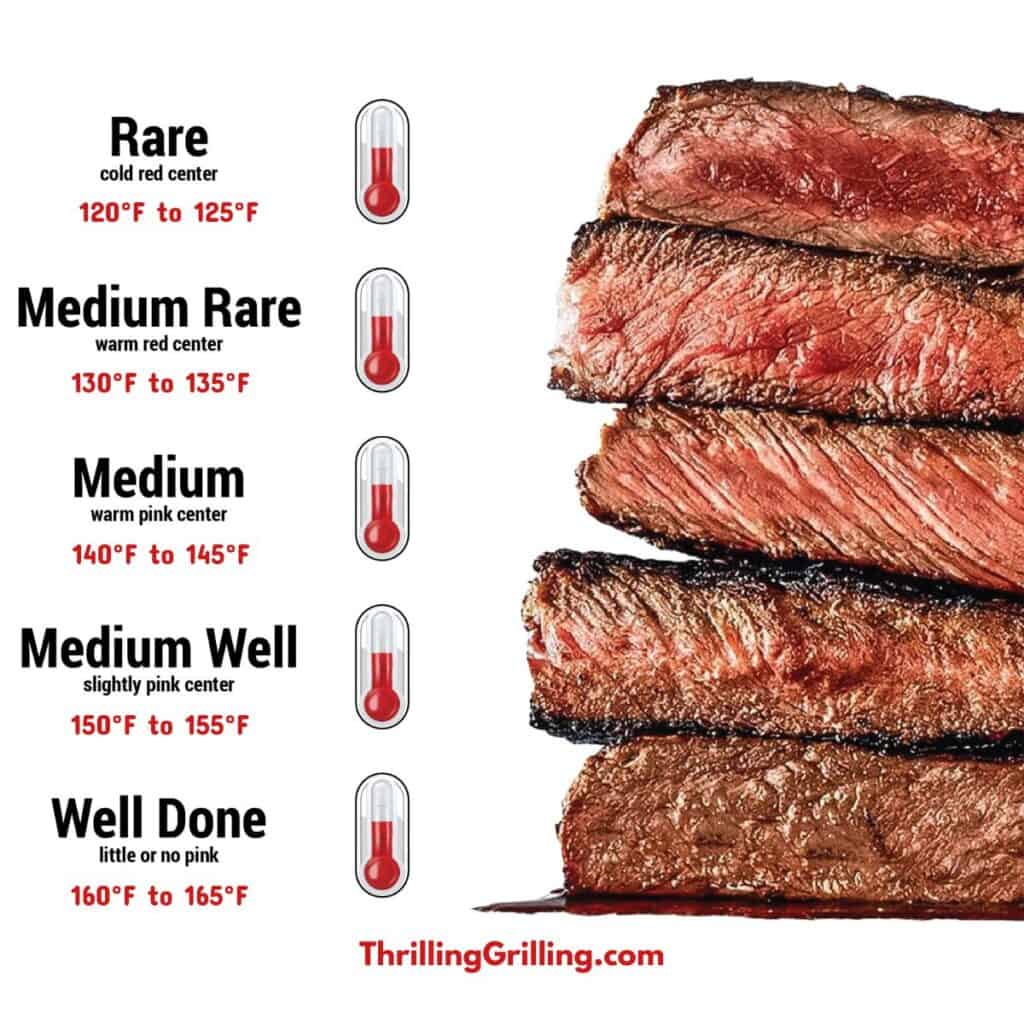
If you’re feeling adventurous, you can use the hamburger temperature chart below to ensure you hit the desired temperature.
- Rare: 120 F to 125 F – A rare burger will be cooked on the outside but still very red on the interior with very loose meat. It is not safe to eat a burger at this temperature.
- Medium Rare: 130 F to 135 F – Medium rare burgers are seared on the outside but still very red and somewhat loose on the inside.
- Medium: 140 F to 145 F – A burger cooked to medium will be firmer in texture with a light pink interior that’s still quite juicy.
- Medium Well: 150 F to 155 F – When a burger reaches medium well there is very little pink left inside and the exterior has already started to dry out.
- Well Done: 160 F to 165 F – A well done burger will have no pink inside at all, and it will probably be dry and tough.
If you’re using store bought ground beef (meaning you didn’t grind it yourself) it’s a good idea cook it to 160 F for safety reasons. The exception to this rule is if you pasteurize the meat for 12 minutes at 140 F (scroll down to learn more about that process).
Why Burger Temperature Matters
I know what you’re thinking.
“If I can eat a medium rare steak that’s still red in the middle, why can’t I do the same with a burger?”
In a word: bacteria.
More specifically, Escherichia coli (E. coli).
E. coli is a dangerous bacteria found in the intestines of many animals including cows. It most often causes diarrhea and severe stomach cramps, but it can also cause kidney failure and even death.
Anyone can get sick from E. coli but certain groups are more at risk including children under 5, adults over 65, and those with a weakened immune systems.
Note – I’m not a doctor, so I’m going to point you to what the experts have to say. Here’s some articles from the USDA, CDC, and the Mayo Clinic with more info.
E. coli is especially dangerous in ground meat because of the way it’s processed. When you throw a steak on the grill, any E. coli on the surface will be killed as it cooks. E. coli can’t penetrate the steak’s interior so you don’t have to worry about the inside reaching 160 F.
But when meat goes through a grinder any E. coli (or other bacteria such as Listeria or Staphylococcus) gets spread through throughout the entire batch.
Making matters worse, store bought beef is grounded in huge batches and a single package may contain portions of a thousand or more cows. If just one of those cows has E coli. in it the entire batch can be contaminated.
How Long Does It Take To Cook A Burger?
First of all, you should always cook meat to temperature and not by time. There are too many variables that can affect cooking time including:
- Cooking method (grilling, pan-searing, etc,)
- Cooking temperature of your grill, smoker, or stove
- Thickness and density of the meat
- Ambient temperature and weather if cooking outside
A MasterChef like Gordon Ramsey can determine a burger’s internal temperature by simply poking it with his finger. But for ordinary folks like us a reliable instant read thermometer is a must.
Simply insert the thermometer into the thickest part of the burger and you’ll get an accurate reading in just a few seconds.
The Thermapen is considered the gold standard in instant read thermometers but they are pretty pricey for a home chef. If you need something more affordable check out this one from Thermapro.
If you don’t have an instant read thermometer, get one. In the meantime you can use the chart below to estimate hamburger cooking time.
- Rare Burger Cook Time: 4 minutes
- Medium Rare Burger Cook Time: 5 minutes
- Medium Burger Cook Time: 6-7 minutes
- Medium Well Cook Time: 7-8 minutes
- Well Done Burger Time: 8-9 minutes
Remember, these times are just estimates. A burger patty an inch thick will obviously take longer to cook than one that’s only ½ inch thick.
And these times don’t apply at all to smash burgers, they’re a whole separate topic.
Reducing The Risk Of Contamination
There are some very simple precautions you can take to reduce the risk of contamination when preparing burgers. Follow the tips below:
- Keep ground beef refrigerated below 40 F until you’re ready to start
- Thoroughly wash your hands before and after handling raw meat.
- Use separate prep areas and utensils for raw meat and any fresh ingredients
- Clean all kitchen surfaces and prep areas before and after preparing foods
Honestly, these are good rules to follow when preparing any meal.
Pasteurization And Food Safety
Pasteurization is the process of heating food products to kill of harmful bacteria and other pathogens.
Most people just assume this means they have to cook their food to a specific temperature (for example chicken breast should be cooked to 165 F and burgers to a temp of 160 F). But temperature is only part of the equation.
What many people don’t realize is that pasteurizing food is actually a combination of both time and temperature.
Yes, cooking burgers to an internal temperature of 165 F will kill 99.99999 percent of pathogens pretty much instantly.
But you can get the same result by getting the internal temperature to 145 F and maintaining that temp for just 4 minutes. And your burger will be much more juicy and much less like a hockey puck!
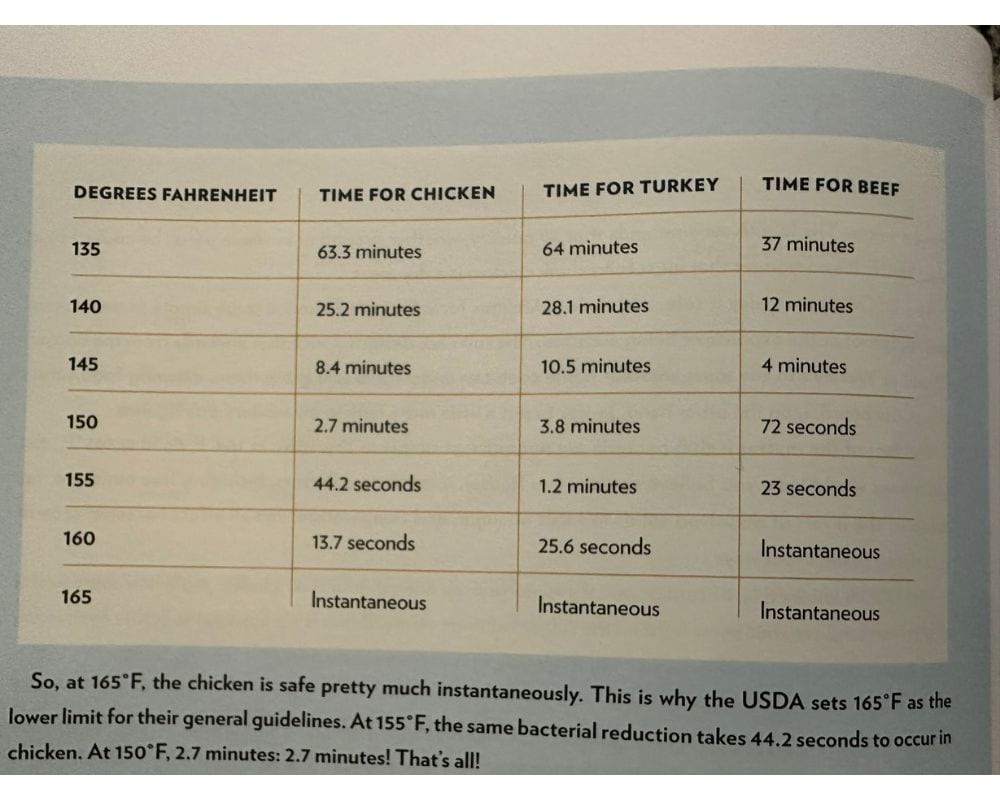
If you have a copy of The Food Lab by J. Kenji Lopez-Alt ( and if you don’t have the book you should buy it right now) turn to page 362 and you’ll see a nifty chart listing various proteins and both the temperature and time needed to make the food safe to eat.

As you can see, beef doesn’t need to be cooked all the way to 160 F if you can maintain it at a temp of 145 F for 4 minutes or 150 F for just 72 seconds.
The Perfect Burger Via Two-Stage Cooking
Most people just fire up their grill and toss on some burgers to cook directly over high heat until they’re done. More often than not they’re left with a dry and disappointing burger.
Here’s how to build a better burger…
Cook your burger in two stages. Start on lower indirect heat until the burger’s internal temperature is about 10 degrees shy of your target temp, then finish them off on high heat so you still get a deliciously browned exterior.
If you’re using a pellet grill start with the temperature set low until the burgers are almost done and then crank the heat up for the last couple of minutes.
With a standard grill you’d set it up for two-zone grilling and start cooking the burgers over indirect heat and then move them right over the flame to finish them off.
You can even use the two-stage cooking method indoors. Place your burger patties on a sheet pan and cook in the oven until they’re within 10 degrees of your target temperature. Then pull them out of the oven and sear them in a hot pan on the stove.
Then sit down with a cold drink and enjoy one of the best burgers you’ll ever taste.


